پرینترهایی که از تکنولوژی بلوتوث پشتیبانی میکنند این امکان را فراهم میکنند تا بدون نیاز به هیچگونه کابلی تجهیزات مختلف به آن متصل شده و کارهای موردنیاز خود را انجام دهند.
در این مقاله با کمک فریمورک فلاتر یک اپلیکیشن ساده موبایلی طراحی میکنیم که به پرینتر مورد نظر به وسیله بلوتوث متصل شده و اسناد مورد نیاز را چاپ میکند.
برای شروع کار ابتدا باید در نظر داشته باشید که دو نوع تکنولوژی بلوتوث امروزه وجود دارد.
یک مورد بلوتوث کلاسیک و یکی نیز بلوتوث BLE که مصرف انرژی کمتری دارد. سیستم عامل اندروید از هر دو نوع پشتیبانی میکند اما iOS فقط از نوع دوم پشتیبانی میکند. این نکته مهم است که پرینتری که قصد استفاده از آن را دارید نیز از تکنولوژی مشابه سیستم عامل مورد استفاده پشتیبانی کند.
در محیط برنامه نویسی که از آن همیشه استفاده میکنید یک پروژه ابتدایی فلاتر ایجاد کنید.
اولین پکیجی که به آن نیاز داریم blue_print_pos میباشد. همانند کتابخانه های عادی آن را به برنامه اضافه کنید. این پکیج فقط از اندروید و iOS در فلاتر پشتیبانی میکند.
برای مدیریت سطح دسترسی ها نیز از پکیج permission_handler استفاده خواهیم کرد.
در ادامه وارد فایل AndroidManifest.xml میشویم و کدهای زیر را که مربوط به دسترسی های اندروید است مینویسیم.
<!-- Request legacy Bluetooth permissions on older devices. -->
<uses-permission android:name="android.permission.BLUETOOTH"
                 android:maxSdkVersion="30" />
<uses-permission android:name="android.permission.BLUETOOTH_ADMIN"
                 android:maxSdkVersion="30" />

<!-- Needed only if your app looks for Bluetooth devices.
     If your app doesn't use Bluetooth scan results to derive physical
     location information, you can strongly assert that your app
     doesn't derive physical location. -->
<uses-permission android:name="android.permission.BLUETOOTH_SCAN" />

<!-- Needed only if your app communicates with already-paired Bluetooth
     devices. -->
<uses-permission android:name="android.permission.BLUETOOTH_CONNECT" />

<!-- Needed only if your app uses Bluetooth scan results to derive physical location. -->
<uses-permission android:name="android.permission.ACCESS_COARSE_LOCATION"/>
برای iOS نیز در فایل Info.plist کدهای زیر را قرار میدهیم.
<key>NSBluetoothAlwaysUsageDescription</key>
<string>Need BLE permission</string>
<key>NSBluetoothPeripheralUsageDescription</key>
<string>Need BLE permission</string>
<key>NSLocationAlwaysAndWhenInUseUsageDescription</key>
<string>Need Location permission</string>
<key>NSLocationAlwaysUsageDescription</key>
<string>Need Location permission</string>
<key>NSLocationWhenInUseUsageDescription</key>
<string>Need Location permission</string>
برای آزمایش کار میخواهیم یک عکس را از طریق پرینتر چاپ کنیم. به همین منظور تصویر مورد نظر را داخل پوشه assets قرار میدهیم و نام آن را logo.jpg میگذاریم. تنظیمات فایل pubspec.yaml را نیز متعاقبا نیاز است تا برای تصویر اعمال کنید.
برای مطالعه بیشتر به آموزش کار با تصاویر در فریمورک فلاتر مراجعه کنید.
حالا میتوانید تمام کدهای فایل main را بصورت زیر کپی و استفاده کنید. این کد شامل اسکن تمام دیوایس های بلوتوث و اتصال به آن میباشد.
import 'dart:convert';
import 'dart:io';
import 'dart:typed_data';
import 'package:blue_print_pos/blue_print_pos.dart';
import 'package:blue_print_pos/models/blue_device.dart';
import 'package:blue_print_pos/models/connection_status.dart';
import 'package:blue_print_pos/receipt/receipt_section_text.dart';
import 'package:blue_print_pos/receipt/receipt_text_size_type.dart';
import 'package:blue_print_pos/receipt/receipt_text_style_type.dart';
import 'package:flutter/foundation.dart';
import 'package:flutter/material.dart';
import 'package:flutter/services.dart';
import 'package:permission_handler/permission_handler.dart';
void main() {
runApp(const MyApp());
}
class MyApp extends StatelessWidget {
const MyApp({Key? key}) : super(key: key);
// This widget is the root of your application.
@override
Widget build(BuildContext context) {
return MaterialApp(
title: 'Bluetooth Print Demo',
theme: ThemeData(
// This is the theme of your application.
//
// Try running your application with "flutter run". You'll see the
// application has a blue toolbar. Then, without quitting the app, try
// changing the primarySwatch below to Colors.green and then invoke
// "hot reload" (press "r" in the console where you ran "flutter run",
// or simply save your changes to "hot reload" in a Flutter IDE).
// Notice that the counter didn't reset back to zero; the application
// is not restarted.
primarySwatch: Colors.blue,
),
home: const MyHomePage(title: 'Bluetooth Print Demo'),
);
}
}
class MyHomePage extends StatefulWidget {
const MyHomePage({Key? key, required this.title}) : super(key: key);
// This widget is the home page of your application. It is stateful, meaning
// that it has a State object (defined below) that contains fields that affect
// how it looks.
// This class is the configuration for the state. It holds the values (in this
// case the title) provided by the parent (in this case the App widget) and
// used by the build method of the State. Fields in a Widget subclass are
// always marked "final".
final String title;
@override
State<MyHomePage> createState() => _MyHomePageState();
}
class _MyHomePageState extends State<MyHomePage> {
final BluePrintPos _bluePrintPos = BluePrintPos.instance;
List<BlueDevice> _blueDevices = <BlueDevice>[];
BlueDevice? _selectedDevice;
bool _isLoading = false;
int _loadingAtIndex = -1;
Future<void> _onScanPressed() async {
if (Platform.isAndroid) {
Map<Permission, PermissionStatus> statuses = await [
Permission.bluetoothScan,
Permission.bluetoothConnect,
].request();
if (statuses[Permission.bluetoothScan] != PermissionStatus.granted ||
statuses[Permission.bluetoothConnect] != PermissionStatus.granted) {
return;
}
}
setState(() => _isLoading = true);
_bluePrintPos.scan().then((List<BlueDevice> devices) {
if (devices.isNotEmpty) {
setState(() {
_blueDevices = devices;
_isLoading = false;
});
} else {
setState(() => _isLoading = false);
}
});
}
void _onDisconnectDevice() {
_bluePrintPos.disconnect().then((ConnectionStatus status) {
if (status == ConnectionStatus.disconnect) {
setState(() {
_selectedDevice = null;
});
}
});
}
void _onSelectDevice(int index) {
setState(() {
_isLoading = true;
_loadingAtIndex = index;
});
final BlueDevice blueDevice = _blueDevices[index];
_bluePrintPos.connect(blueDevice).then((ConnectionStatus status) {
if (status == ConnectionStatus.connected) {
setState(() => _selectedDevice = blueDevice);
} else if (status == ConnectionStatus.timeout) {
_onDisconnectDevice();
} else {
if (kDebugMode) {
print('$runtimeType - something wrong');
}
}
setState(() => _isLoading = false);
});
}
Future<void> _onPrintReceipt() async {
/// Example for Print Image
final ByteData logoBytes = await rootBundle.load(
'assets/logo.jpg',
);
/// Example for Print Text
final ReceiptSectionText receiptText = ReceiptSectionText();
receiptText.addImage(
base64.encode(Uint8List.view(logoBytes.buffer)),
width: 300,
);
receiptText.addSpacer();
receiptText.addText(
'EXCEED YOUR VISION',
size: ReceiptTextSizeType.medium,
style: ReceiptTextStyleType.bold,
);
receiptText.addText(
'MC Koo',
size: ReceiptTextSizeType.small,
);
receiptText.addSpacer(useDashed: true);
receiptText.addLeftRightText('Time', '04/06/22, 10:30');
receiptText.addSpacer(useDashed: true);
receiptText.addLeftRightText(
'Apple 4pcs',
'\$ 10.00',
leftStyle: ReceiptTextStyleType.normal,
rightStyle: ReceiptTextStyleType.bold,
);
receiptText.addSpacer(useDashed: true);
receiptText.addLeftRightText(
'TOTAL',
'\$ 10.00',
leftStyle: ReceiptTextStyleType.normal,
rightStyle: ReceiptTextStyleType.bold,
);
receiptText.addSpacer(useDashed: true);
receiptText.addLeftRightText(
'Payment',
'Cash',
leftStyle: ReceiptTextStyleType.normal,
rightStyle: ReceiptTextStyleType.normal,
);
receiptText.addSpacer(count: 2);
await _bluePrintPos.printReceiptText(receiptText);
/// Example for print QR
await _bluePrintPos.printQR('https://www.google.com/', size: 250);
/// Text after QR
final ReceiptSectionText receiptSecondText = ReceiptSectionText();
receiptSecondText.addText('Powered by Google',
size: ReceiptTextSizeType.small);
receiptSecondText.addSpacer();
await _bluePrintPos.printReceiptText(receiptSecondText, feedCount: 1);
}
@override
Widget build(BuildContext context) {
// This method is rerun every time setState is called, for instance as done
// by the _incrementCounter method above.
//
// The Flutter framework has been optimized to make rerunning build methods
// fast, so that you can just rebuild anything that needs updating rather
// than having to individually change instances of widgets.
return Scaffold(
appBar: AppBar(
// Here we take the value from the MyHomePage object that was created by
// the App.build method, and use it to set our appbar title.
title: Text(widget.title),
),
body: SafeArea(
child: _isLoading && _blueDevices.isEmpty
? const Center(
child: CircularProgressIndicator(
valueColor: AlwaysStoppedAnimation<Color>(Colors.blue),
),
)
: _blueDevices.isNotEmpty
? SingleChildScrollView(
padding: const EdgeInsets.all(16),
child: Column(
crossAxisAlignment: CrossAxisAlignment.start,
children: <Widget>[
Column(
children: List<Widget>.generate(_blueDevices.length,
(int index) {
return Row(
children: <Widget>[
Expanded(
child: GestureDetector(
onTap: _blueDevices[index].address ==
(_selectedDevice?.address ?? '')
? _onDisconnectDevice
: () => _onSelectDevice(index),
child: Padding(
padding: const EdgeInsets.all(8.0),
child: Column(
crossAxisAlignment:
CrossAxisAlignment.start,
children: <Widget>[
Text(
_blueDevices[index].name,
style: TextStyle(
color: _selectedDevice?.address ==
_blueDevices[index]
.address
? Colors.blue
: Colors.black,
fontSize: 20,
fontWeight: FontWeight.w500,
),
),
Text(
_blueDevices[index].address,
style: TextStyle(
color: _selectedDevice?.address ==
_blueDevices[index]
.address
? Colors.blueGrey
: Colors.grey,
fontSize: 14,
fontWeight: FontWeight.w500,
),
),
],
),
),
),
),
if (_loadingAtIndex == index && _isLoading)
Container(
height: 24.0,
width: 24.0,
margin: const EdgeInsets.only(right: 8.0),
child: const CircularProgressIndicator(
valueColor: AlwaysStoppedAnimation<Color>(
Colors.blue,
),
),
),
if (!_isLoading &&
_blueDevices[index].address ==
(_selectedDevice?.address ?? ''))
TextButton(
onPressed: _onPrintReceipt,
child: Container(
color: _selectedDevice == null
? Colors.grey
: Colors.blue,
padding: const EdgeInsets.all(8.0),
child: const Text(
'Test Print',
style: TextStyle(color: Colors.white),
),
),
style: ButtonStyle(
backgroundColor: MaterialStateProperty
.resolveWith<Color>(
(Set<MaterialState> states) {
if (states.contains(
MaterialState.pressed)) {
return Theme.of(context)
.colorScheme
.primary
.withOpacity(0.5);
}
return Theme.of(context).primaryColor;
},
),
),
),
],
);
}),
),
],
),
)
: Center(
child: Column(
mainAxisAlignment: MainAxisAlignment.center,
children: const <Widget>[
Text(
'Scan bluetooth device',
style: TextStyle(fontSize: 24, color: Colors.blue),
),
Text(
'Press button scan',
style: TextStyle(fontSize: 14, color: Colors.grey),
),
],
),
),
),
floatingActionButton: FloatingActionButton(
onPressed: _isLoading ? null : _onScanPressed,
child: const Icon(Icons.search),
backgroundColor: _isLoading ? Colors.grey : Colors.blue,
), // This trailing comma makes auto-formatting nicer for build methods.
);
}
}
از برنامه خروجی گرفته و روی گوشی موبایل آن را نصب کنید و یا به وسیله شبیه ساز آن را اجرا کنید.
روی دکمه جستجو کلیک کنید تا لیست تمام دستگاه های دارای بلوتوث را اطراف شما نمایش دهد.
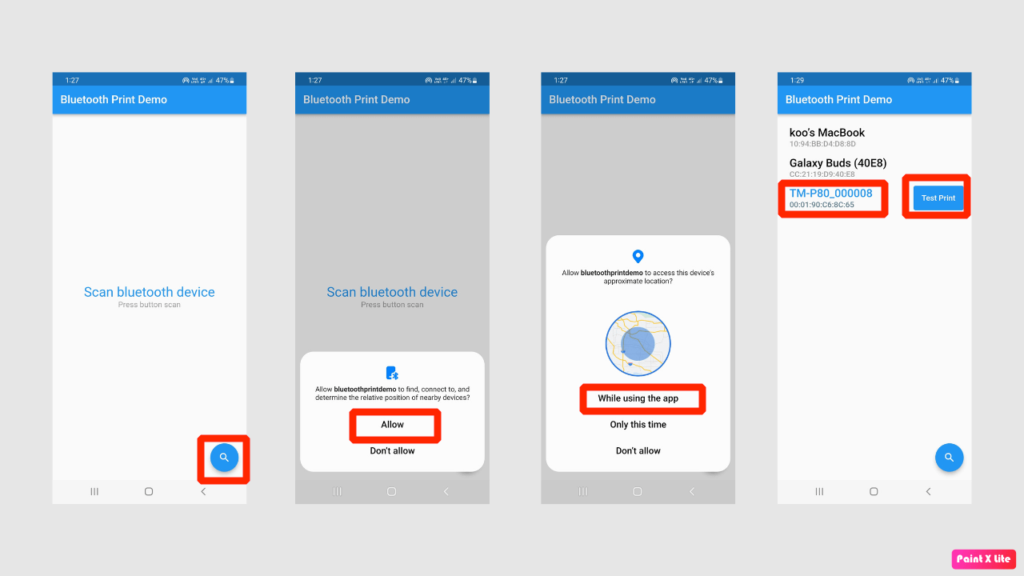
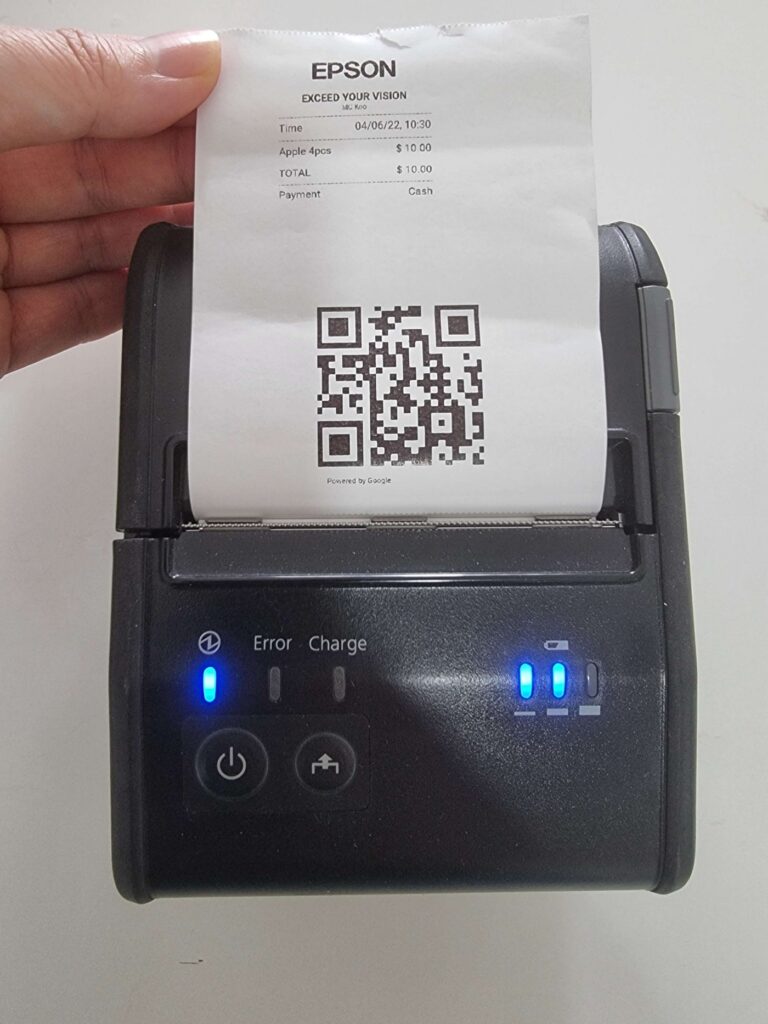
روی نام بلوتوث پرینتر کلیک کنید تا مراحل اتصال به آن آغاز شود. بعد از اتصال دکمه Test Print در اپلیکیشن نمایش داده میشود که با کلیک کردن روی آن عکس ذخیره شده در برنامه پرینت گرفته خواهد شد.
در این آموزش با نحوه اتصال به پرینترهای بلوتوثی آشنا شدید, با تغییر در سورس کد فلاتر میتوانید تصاویر, متن و اسناد مختلف را به راحتی پرینت گرفته و استفاده کنید.